¶ Overview
In order to write to the flash partitions directly, we need to access something called fastboot that is build into the Android OS and used by device manufacturers and hackers to modify a device during development.
[TODO: link to information about setting up Android platform tools (adb and fastboot)]
Usually there is a special key combination that one presses while powering on the Android device to tell it to go into fastboot mode instead of booting the OS. As of this writing I have not found such a method for BYD's systems. The only thing similar I have found is ‘Engineering Mode’ that as far as I can tell actually runs an (atypical) Android Recovery image, which doesn't give access to the usual ADB Recovery session, or fastboot. Instead looks for a specific file on a USB disk and uses it to rewrite all of the device's flash memory in one hit, similar to the OTA Upgrade process but accessible when the main OS can't boot. It's used for the recovery processed described here. It's possible there's a way to tell this recovery image to drop into ADB mode, reboot to fastboot directly, or enable other tooling, but I haven't spent any time dissecting it at this stage.
The only way I've found then to enter fastboot mode is to first enable USB ADB, which may require downgrading, enabling sideloading and installing the Wireless ADB Switch Tool if your Android version is missing the ADB menu. It also requires a physical USB OTG cable to the Android unit's micro-USB port. The USB ports accessible from the centre console are not usable for this. I'll describe the process of accessing this port here when I find time. Also to repeat, it must be an OTG cable.
I've also found that some USB host controllers on some laptops are incompatible with the DiLink 3.0 OTG port. I wasted a decent chunk of time and USB OTG cables thinking I had bad cables or that BYD had physicallt disabled the OTG port before thinking to try a different laptop. To my relief, an older laptop worked fine and saw the ADB service immediately once I plugged it in. They were both Intel USB controllers and I'm not sure why one worked and the other didn't, except that the working one was several generations older.
¶ Enabling and accessing Fastboot mode
Once USB ADB is enabled and usable, you can issue this command from your host PC to tell Android to reboot directly into fastboot mode:
adb reboot-bootloaderThe screen will go black, then a few seconds later it will show a screen like the following:
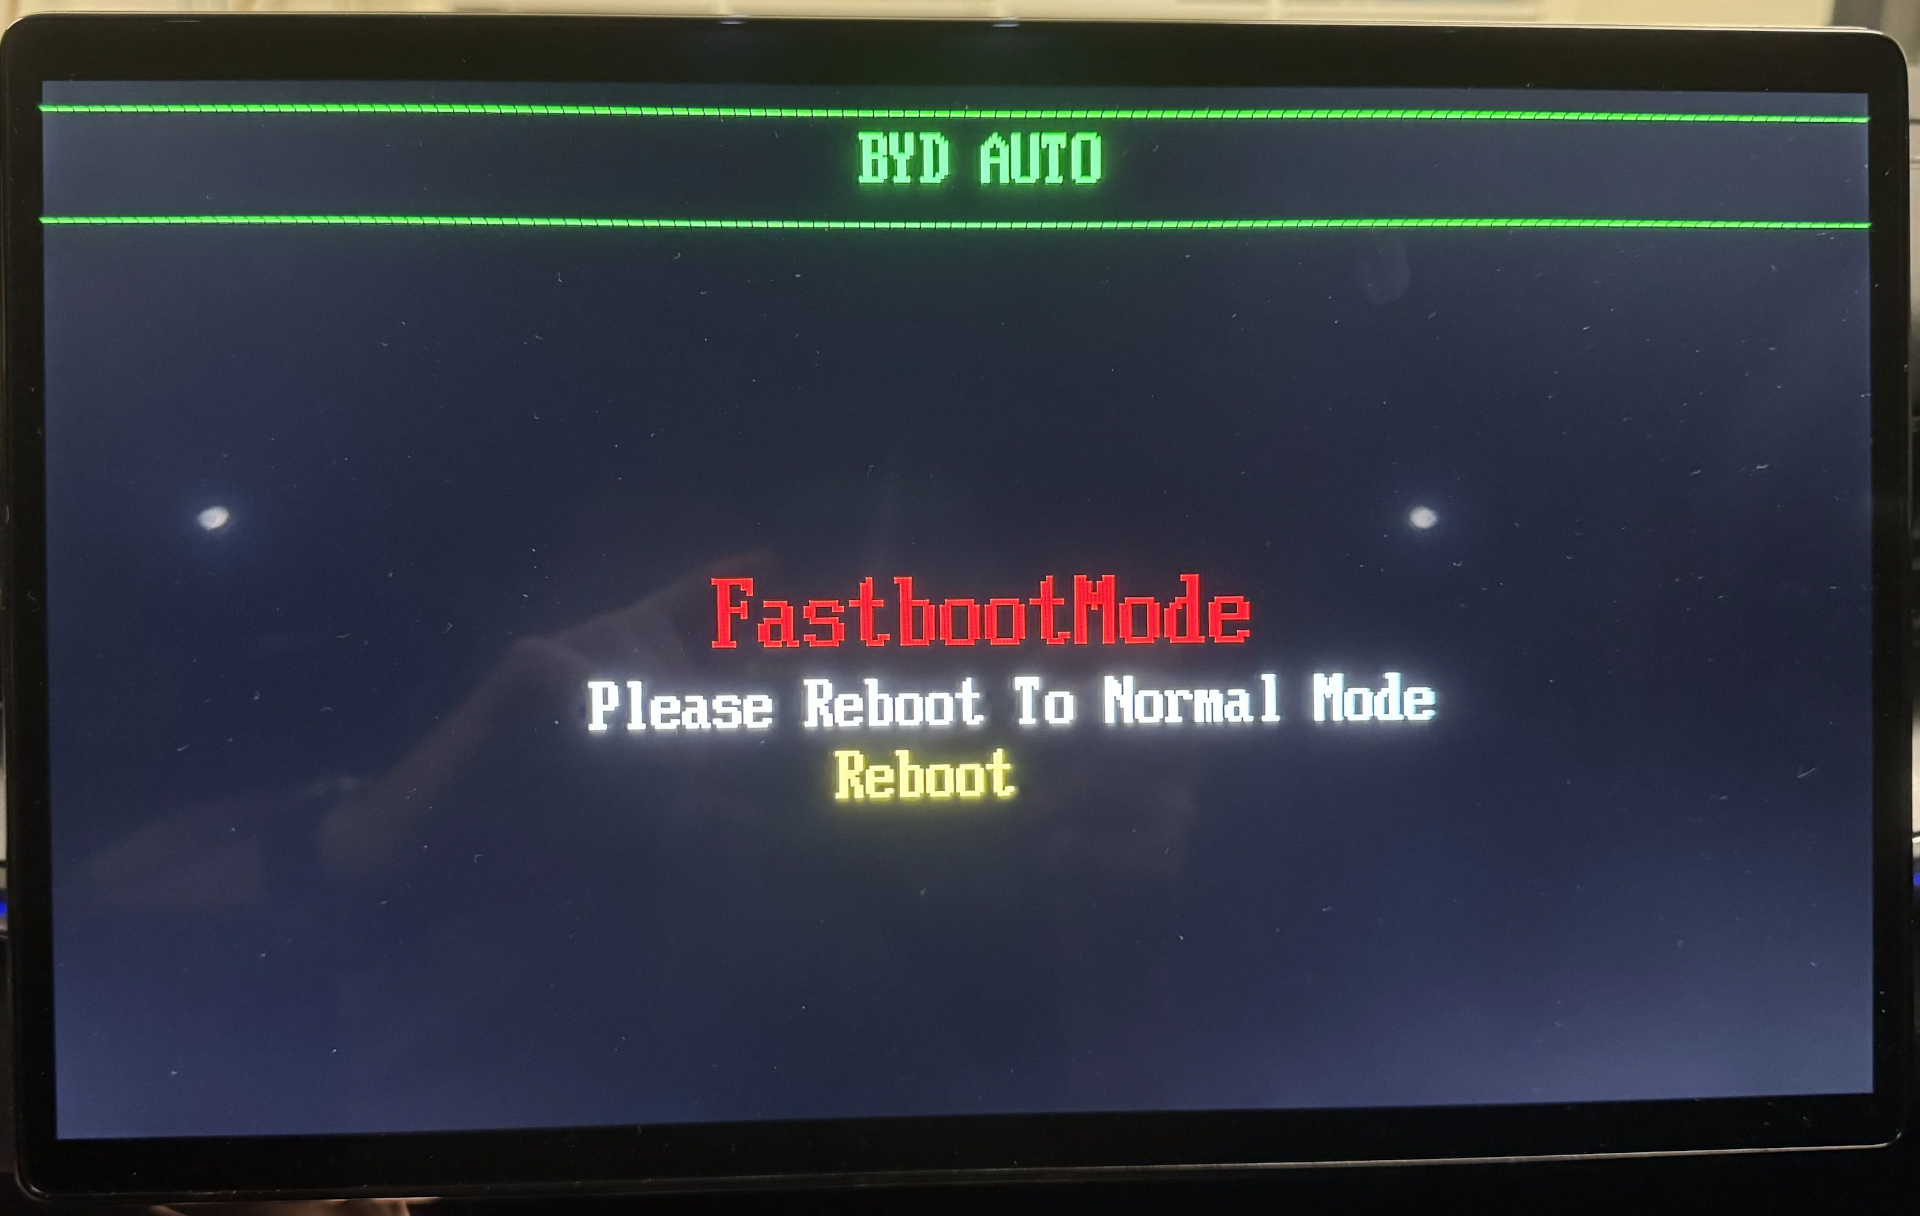
You then have about 5~10 seconds to issue a fastboot command (any command) over USB to prevent it from automatically rebooting back into the main Android OS. I just keep running fastboot devices over and over until it shows a connected fastboot device, which will also stop the DiLink from rebooting.
[TODO] example output
¶ Writing to flash
Inside the 2401 ‘partitions’ package are individual .img files that each represent the contents that needs to be written to the flash partition of the same name (minus the ‘.img’). There are 3 partitions missing from the list below though. The system, vendor, and product partitions cannot be written using fastboot as they are ‘dynamic’ partitions that reside in a larger partition called super. If any of you are familiar with partitioning MSDOS computers then you're probably already thinking this sounds a lot like DOS MBR's ‘Logical Partitions’, and that is exactly what these are more or less. To write those partitions we will need to use “fastbootd mode” which is totally not the same thing as “fastboot mode”. I'll explain that process in the next section.
I'm not entirely sure if Android verified boot has to be disabled if we're only flashing the original unmodified partitions from BYD, but I ran this step anyway as I intended to flash a Magisk-patched (rooted) boot.img. If you skip this step and end up in a bootloop, then next time run this step :)
fastboot --disable-verity --disable-verification flash vbmeta vbmeta.img
fastboot --disable-verity --disable-verification flash vbmeta_system vbmeta_system.imgAfter this completes, proceed to flash the non-dynamic partitions:
fastboot flash abl abl.img
fastboot flash bluetooth bluetooth.img
fastboot flash boot boot.img
fastboot flash cmnlib64 cmnlib64.img
fastboot flash cmnlib cmnlib.img
fastboot flash devcfg devcfg.img
fastboot flash dsp dsp.img
fastboot flash dtbo dtbo.img
fastboot flash hyp hyp.img
fastboot flash imagefv imagefv.img
fastboot flash keymaster keymaster.img
fastboot flash modem modem.img
fastboot flash qupfw qupfw.img
fastboot flash recovery recovery.img
fastboot flash rpm rpm.img
fastboot flash tz tz.img
fastboot flash uefisecapp uefisecapp.img
fastboot flash xbl_config xbl_config.img
fastboot flash xbl xbl.imgHopefully you didn't receive any error messages. If you received a permission denied message running this on Linux then you probably need to run this command as root or via sudo.
If you see write errors on any of the above, first try re-running the failed command. If you end up in a state where some partitions have been changed but others can't be, then you may need to follow the recovery process to get back to a consistent state.
Once these have been written, it's time to move on to the system, vendor, and product partitions via fastbootd.
¶ Enabling Fastbootd mode (which totally isn't the same as fastboot mode)
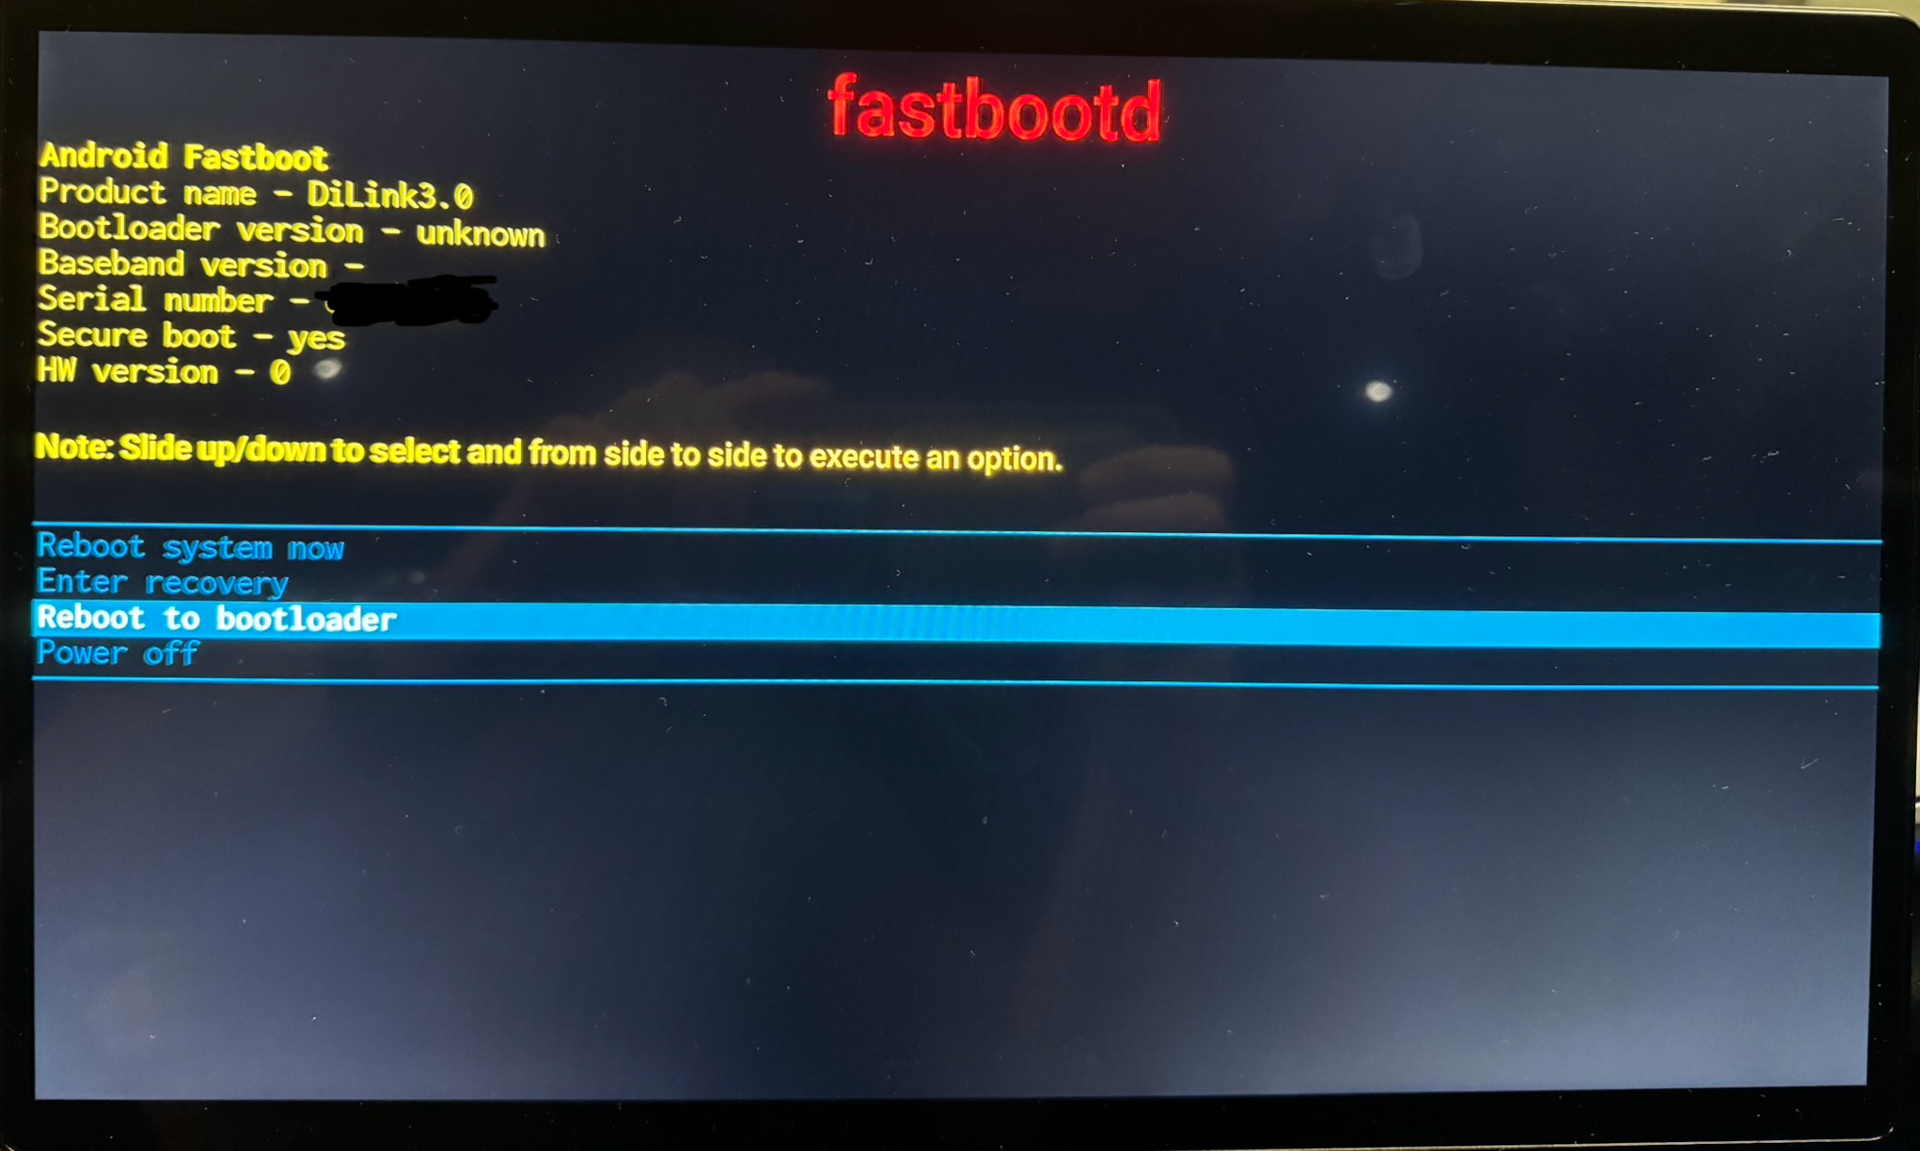
To switch from fastboot mode to fastbootd mode, issue this command from fastboot. (Don't ask me I didn't design this.)
fastboot reboot fastbootYou should then see this screen, which much more closely resembles a conventional Android recovery menu.
(Except apparently it's not Android Recovery, just as it isn't fastboot. It's a new third thing that exists somewhere between the two for some reason):
At this stage you should be able to flash the remaining 3 partitions without issue. You may see that it's actually flashing to a partition with an a or b suffix. This is because it uses what's called an A/B system, where there are 2 copies of those partitions and only 1 gets written to during an upgrade. If the new one fails to boot, the system can revert back to the other slot which is also the last working version. If you're currently booted to the B slot, the A slot will be written during this process and then set to be the active slot on the next boot and vice versa. I believe you can also specify these slots explicitly, eg fastboot flash system_a system.img in case you want to commit to the new version in both slots to prevent a rollback - however I strongly advise not doing this until you've tested the new version and are confident there are no issues. If you do this and it turns out there are issues, once again the recovery process will remedy it
fastboot flash system system.img
fastboot flash product product.img
fastboot flash vendor vendor.imgHopefully these succeed without error. If so, then it's time to reboot into the OS and make sure the upgrade worked.
¶ Hold your breath
fastboot reboot

Again if there are any issues booting, you'll need to follow the recovery process